



GSTR-10 is a type of GST return that must be filed by persons registered under GST upon cancellation or surrender of GST registration.
Who should file GSTR-10?
Any taxpayer who has cancelled or surrendered GST registration is required to file GSTR-10. Regular taxpayers do not file GSTR-10. It is applicable only to persons registered under GST who have applied for surrender or whose registration has been cancelled.
What is the due date for filing GSTR-10?
GSTR-10 must be filed within 3 months from the date of cancellation of GST registration. For example, if the GST registration is cancelled on 1st January, then the due date for filing the final return would be 31st March.
You can also refer to the filing page here: GSTR-10 Final Return Filing.
What information should be provided in GSTR-10?
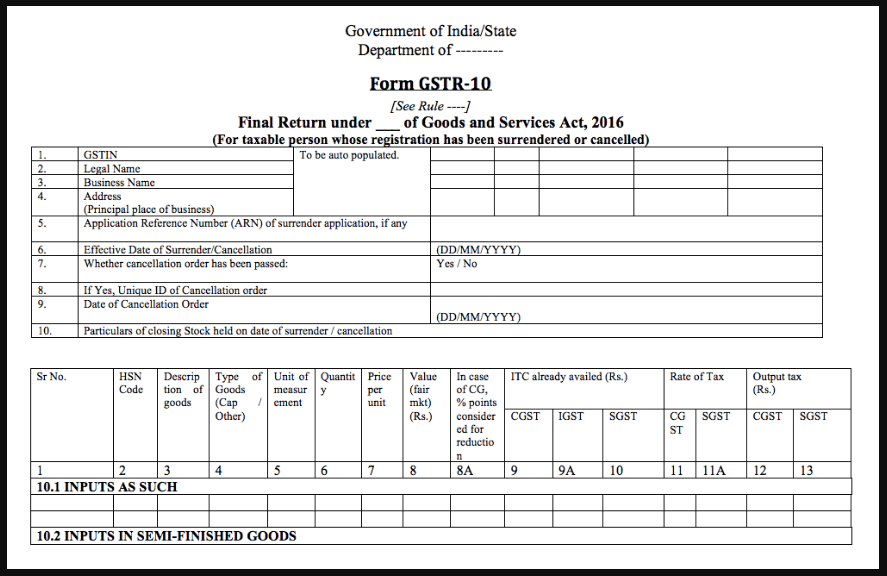
The following details are generally required in the final GST return:
- GSTIN of the taxpayer
- ARN of GST registration surrender application
- Effective date of GST registration surrender / cancellation
- Whether GST cancellation order has been passed
- Unique ID of cancellation order
- Date of cancellation order
- Closing stock held on the date of surrender or cancellation
- Inputs in semi-finished goods
- Inputs in finished goods
- Input services
- Capital goods
- Amount of tax payable on closing stock
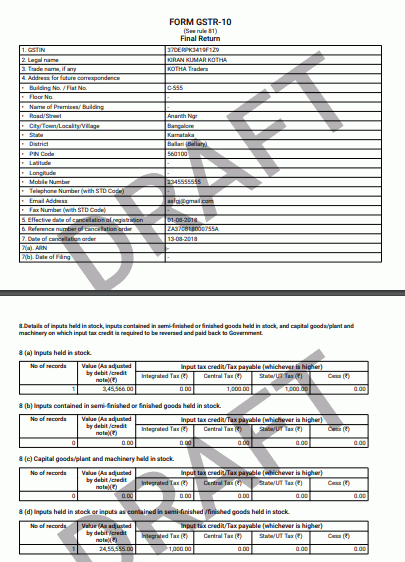
A sample GSTR-10 return is shown below:
What is the penalty for not filing GSTR-10?
If a taxpayer fails to file the final GST return, a notice for non-filing of final return upon cancellation of registration may be issued.
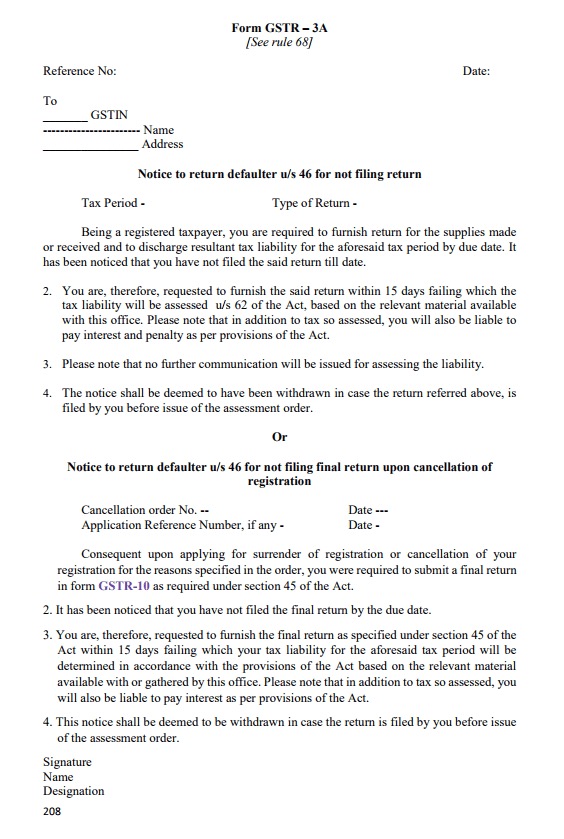
After the notice is issued, the taxpayer is usually given 15 days to file the return along with required documents. If the taxpayer fails to respond or does not file GSTR-10, the tax officer may pass a final cancellation order along with GST liability, interest, or penalty.
To avoid unnecessary litigation and liabilities, taxpayers whose registration is surrendered or cancelled should file GSTR-10 within the prescribed time.
Pre-conditions for filing Form GSTR-10
Given below are the pre-conditions for filing Form GSTR-10:
- The taxpayer must possess a valid user ID and password.
- The taxpayer should have applied for cancellation of registration and an order should have been issued for cancellation, or the registration should have been cancelled suo moto by tax authorities.
Exemptions from filing Form GSTR-10
Form GSTR-10 need not be filed by the following persons:
- Input Service Distributor
- Non-resident taxable persons
- Persons required to deduct tax at source (TDS) under Section 51
- Composition taxpayers paying tax under Section 10
- Persons required to collect tax at source (TCS) under Section 52
Creating and filing details in Form GSTR-10
Below is the step-by-step process to create and file details in Form GSTR-10.
Step 1: Login to the portal
The taxpayer has to log in to the official GST portal.
Step 2: Enter the credentials
Enter the username and password.
Step 3: Click Final Return
From the Services tab, select Returns and click Final Return.

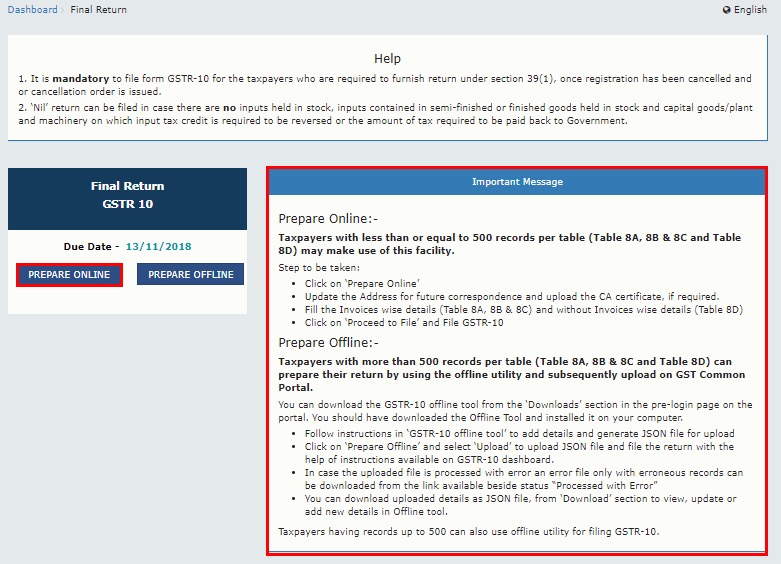
Step 4: Click Prepare Online
Choose Prepare Online if you want to prepare the return directly on the GST portal.
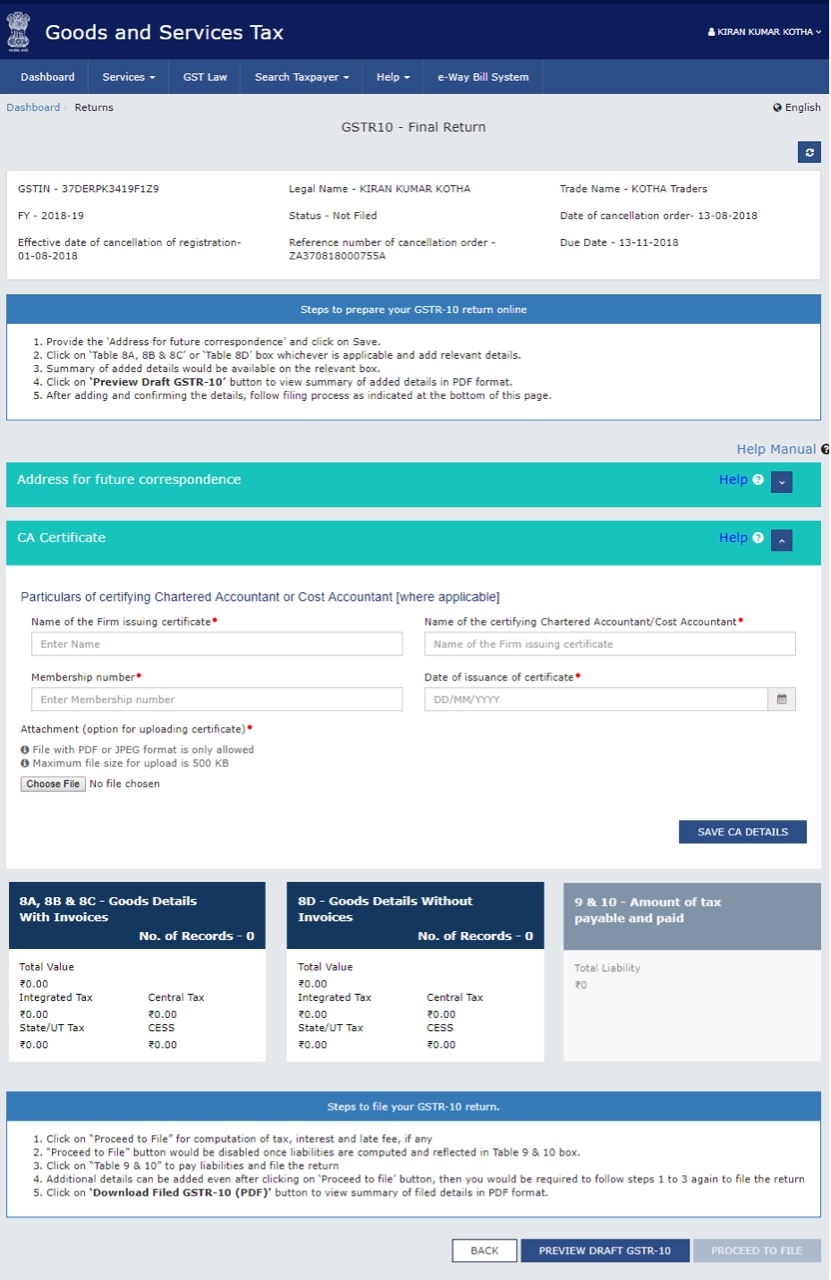
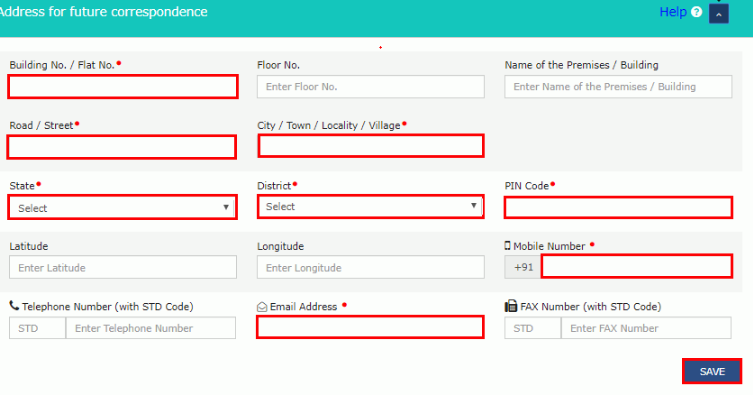
Step 5: Enter the address
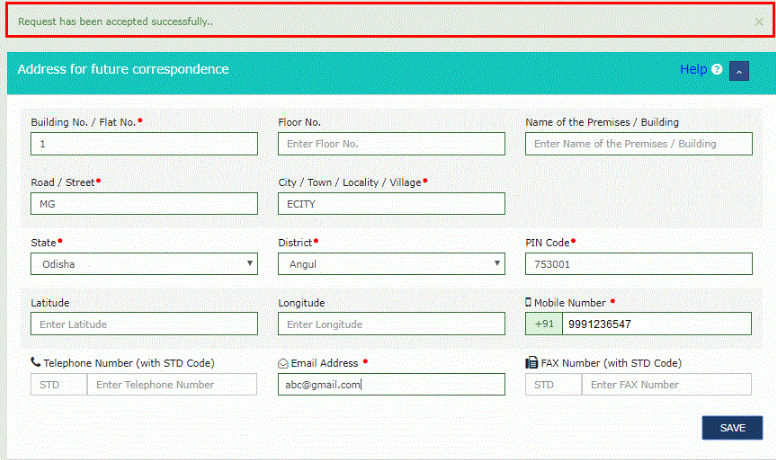
Enter the address for future correspondence. If cancellation was filed in Form REG-16, details may be auto-populated.
Step 6: Click Save
After entering the address, click the Save button.
Step 7: Enter Chartered Accountant or Cost Accountant details
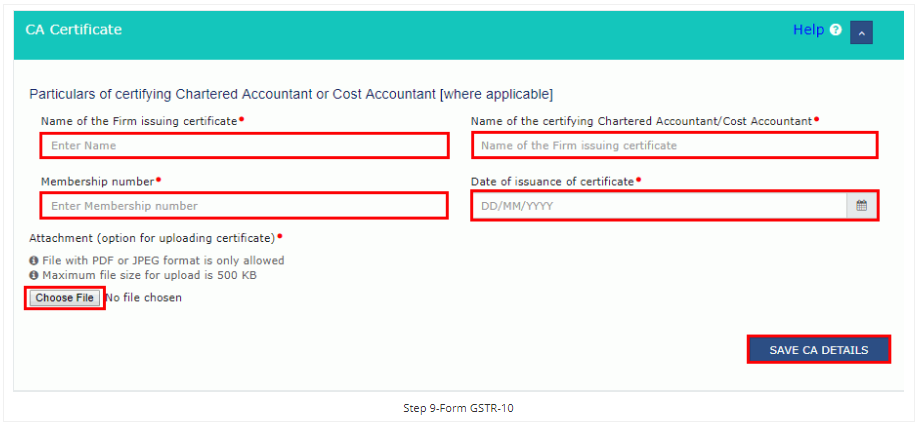
If applicable, enter details under Particulars of Certifying Chartered Accountant or Cost Accountant:
- Name of the certifying accounting firm
- Name of the certifying Chartered Accountant / Cost Accountant
- Membership number of the certifying firm
- Date of the certificate issued by the certifying firm
Step 8: Attach the documents
Upload the scanned copy of the certificate.
Step 9: Click Save CA
Save the CA / Cost Accountant details after upload.
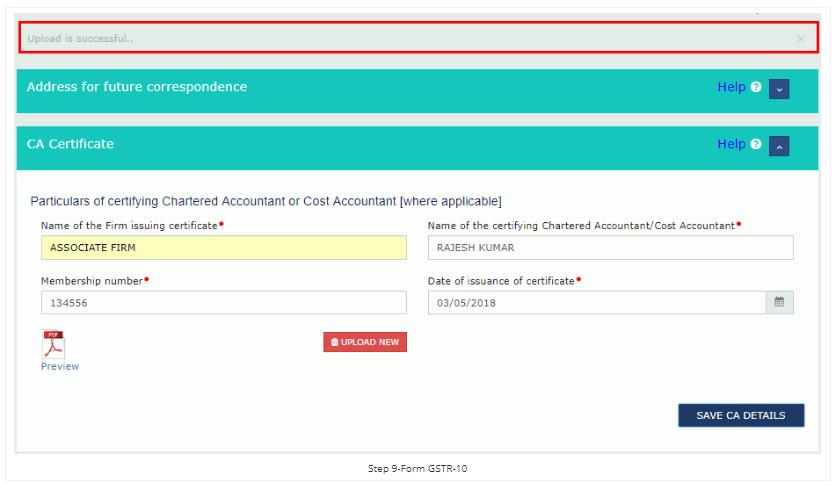
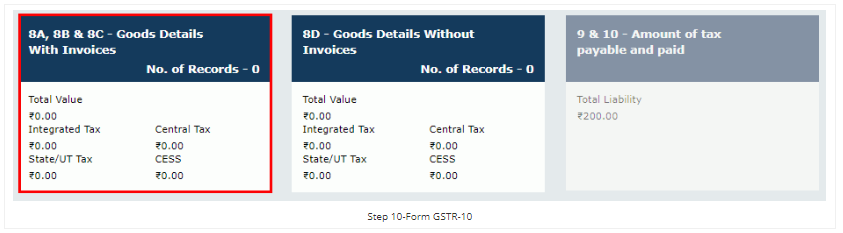
Step 10: Enter details in various tiles
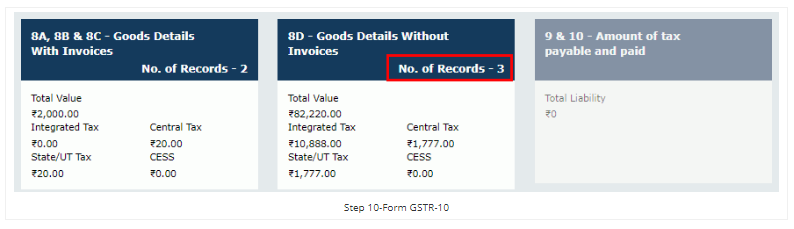
Below are the steps for entering goods details with and without invoices.
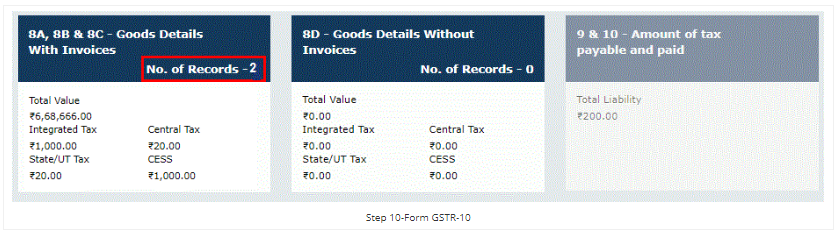
Goods Details With Invoices
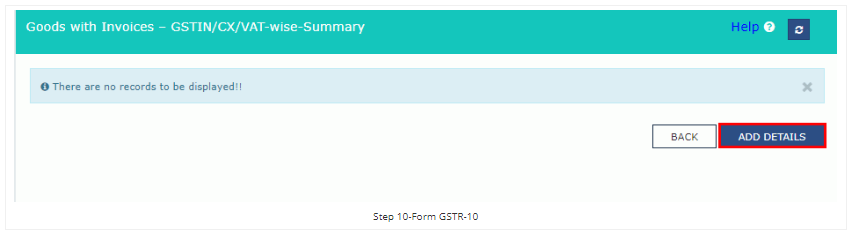
To add goods details with invoices, click the Goods Details With Invoices tile.
Click Add Details.
Select the appropriate regime from the Registered Under dropdown list.
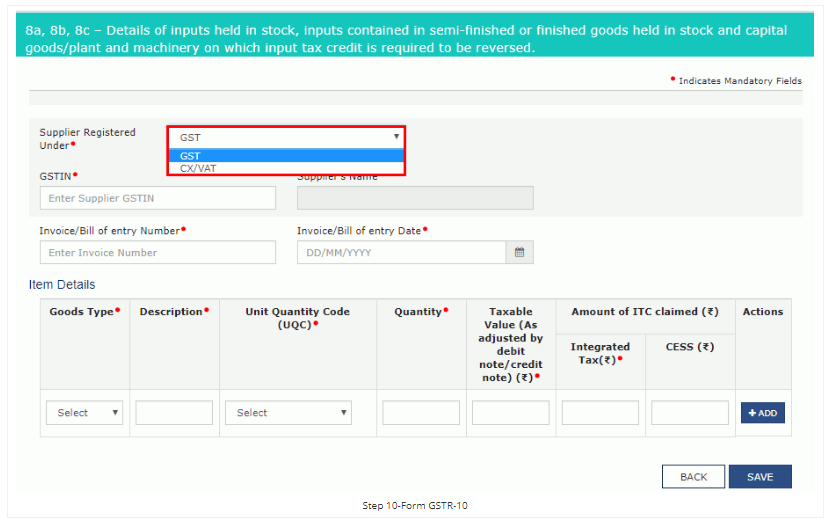
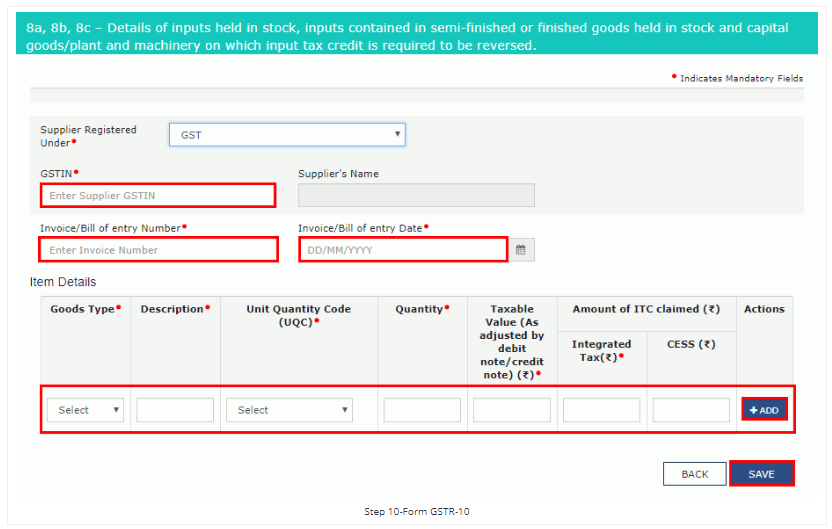
Supplier registered in GST regime
If supplier is registered under GST, provide:
- GSTIN
- Invoice / Bill of Entry number
- Invoice / Bill of Entry date
- Goods details
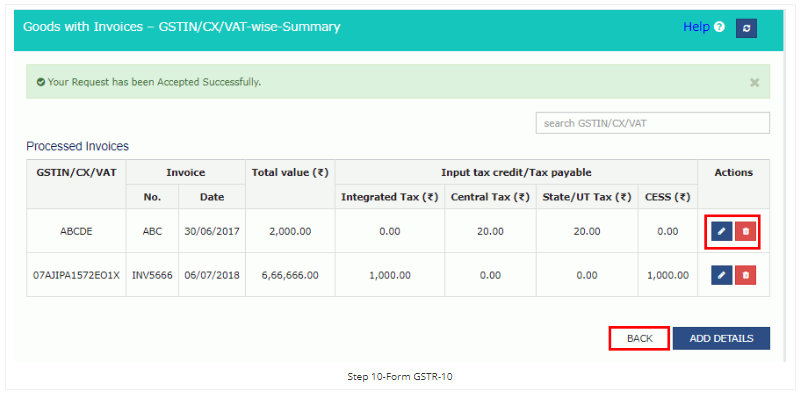
- Click Add
- Click Save
Supplier registered in CX / VAT regime
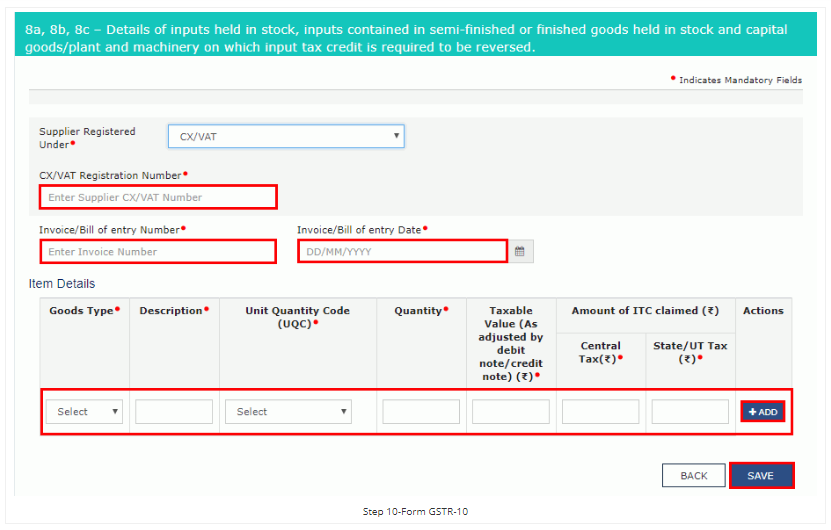
- Enter CX / VAT registration number
- Enter Invoice / Bill of Entry number
- Select Invoice / Bill of Entry date
- Enter goods details
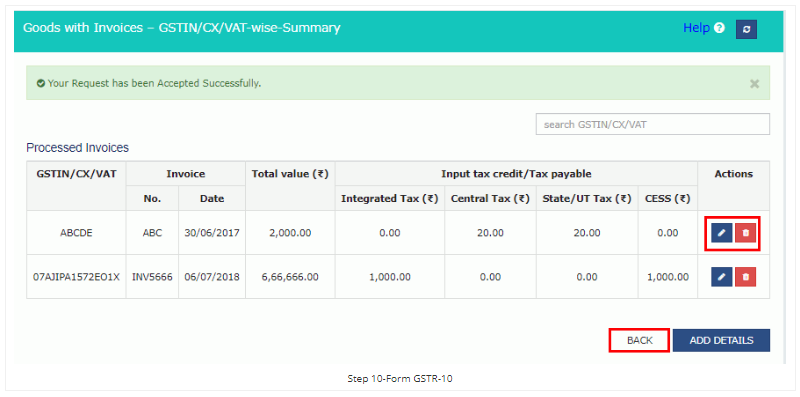
- Click Add and Save
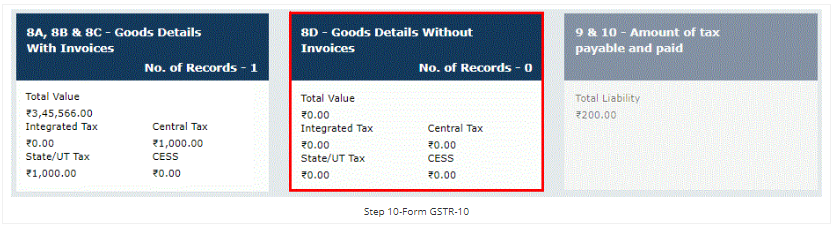
Goods Details Without Invoices
To add goods details without invoices, click the Goods Details Without Invoices tile.
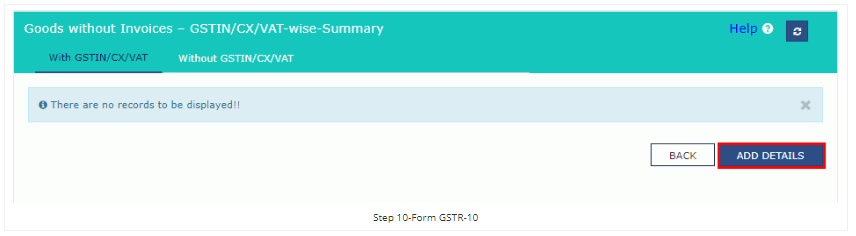
For goods with GSTIN / CX / VAT:
- Click the With GSTIN / CX / VAT tab
- Click Add Details
Select the correct supplier registration type.
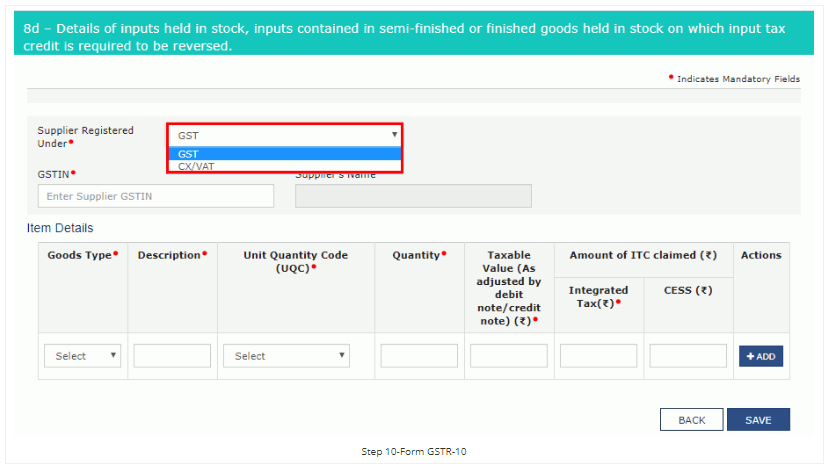
Supplier registered in GST regime
- Enter GSTIN
- Enter Invoice / Bill of Entry number
- Select invoice date
- Enter goods details
- Click Add
- Click Save
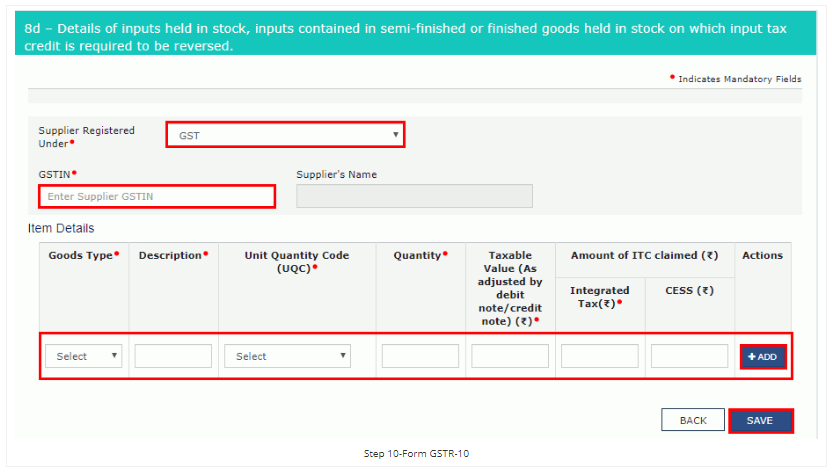
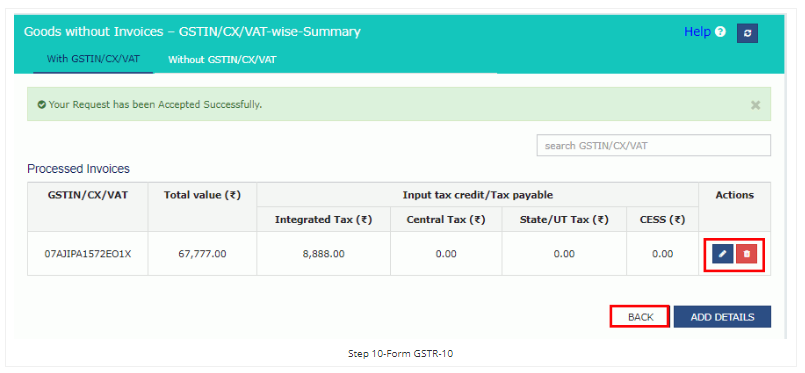
Supplier registered with CX / VAT regime
- Enter the CX / VAT registration number
- Enter goods details
- Click Add
- Click Save
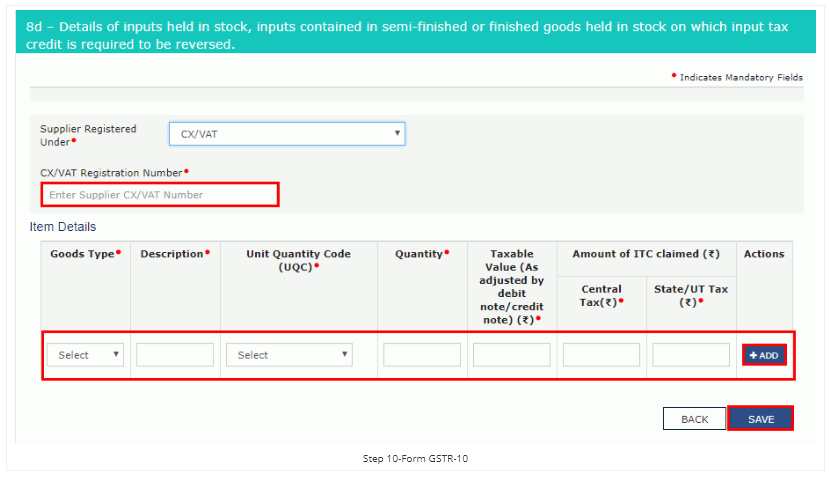
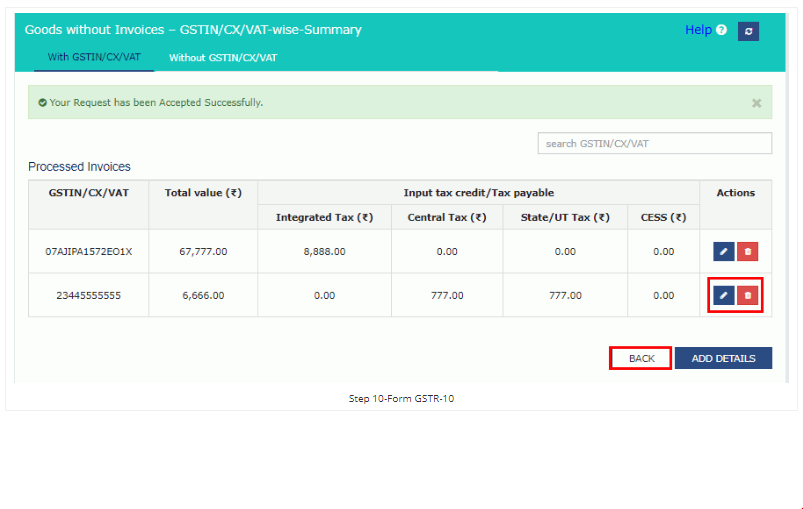
Without GSTIN / CX / VAT
Select the Without GSTIN / CX / VAT tab.
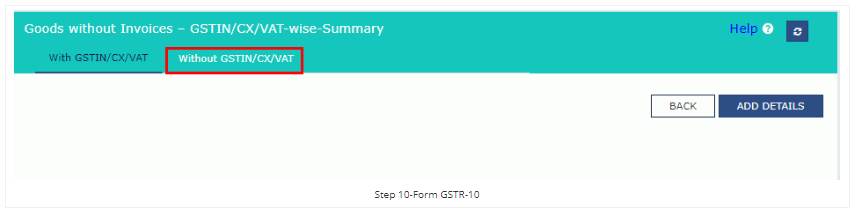
Then click Add Details.
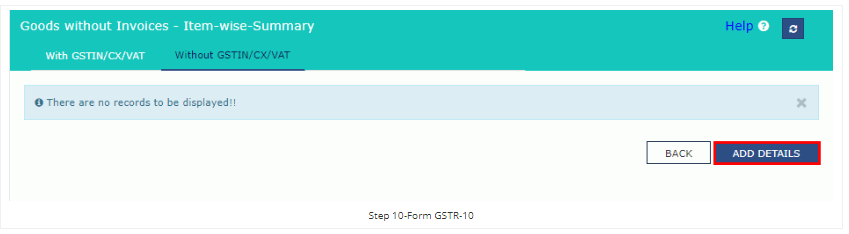
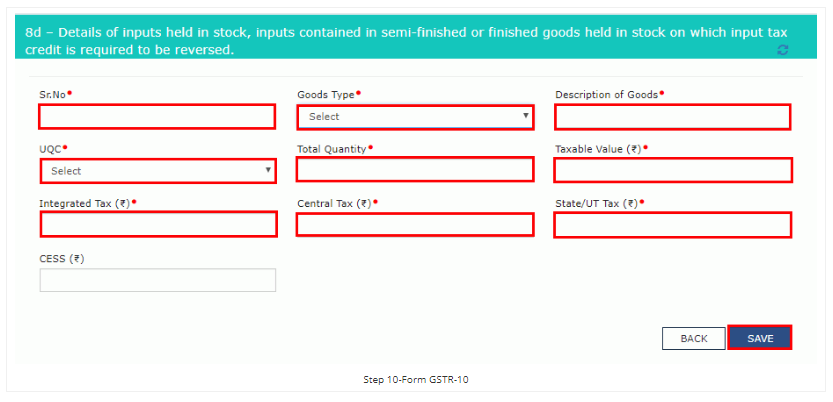
Enter the following details:
- Serial number
- Goods type
- Description of goods
- UQC
- Total quantity
- Total taxable value of outward supply
- Integrated tax, central tax, and state/UT tax details
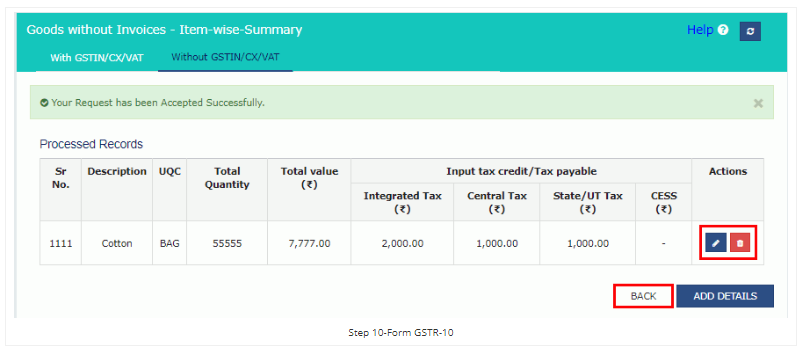
Previewing Form GSTR-10
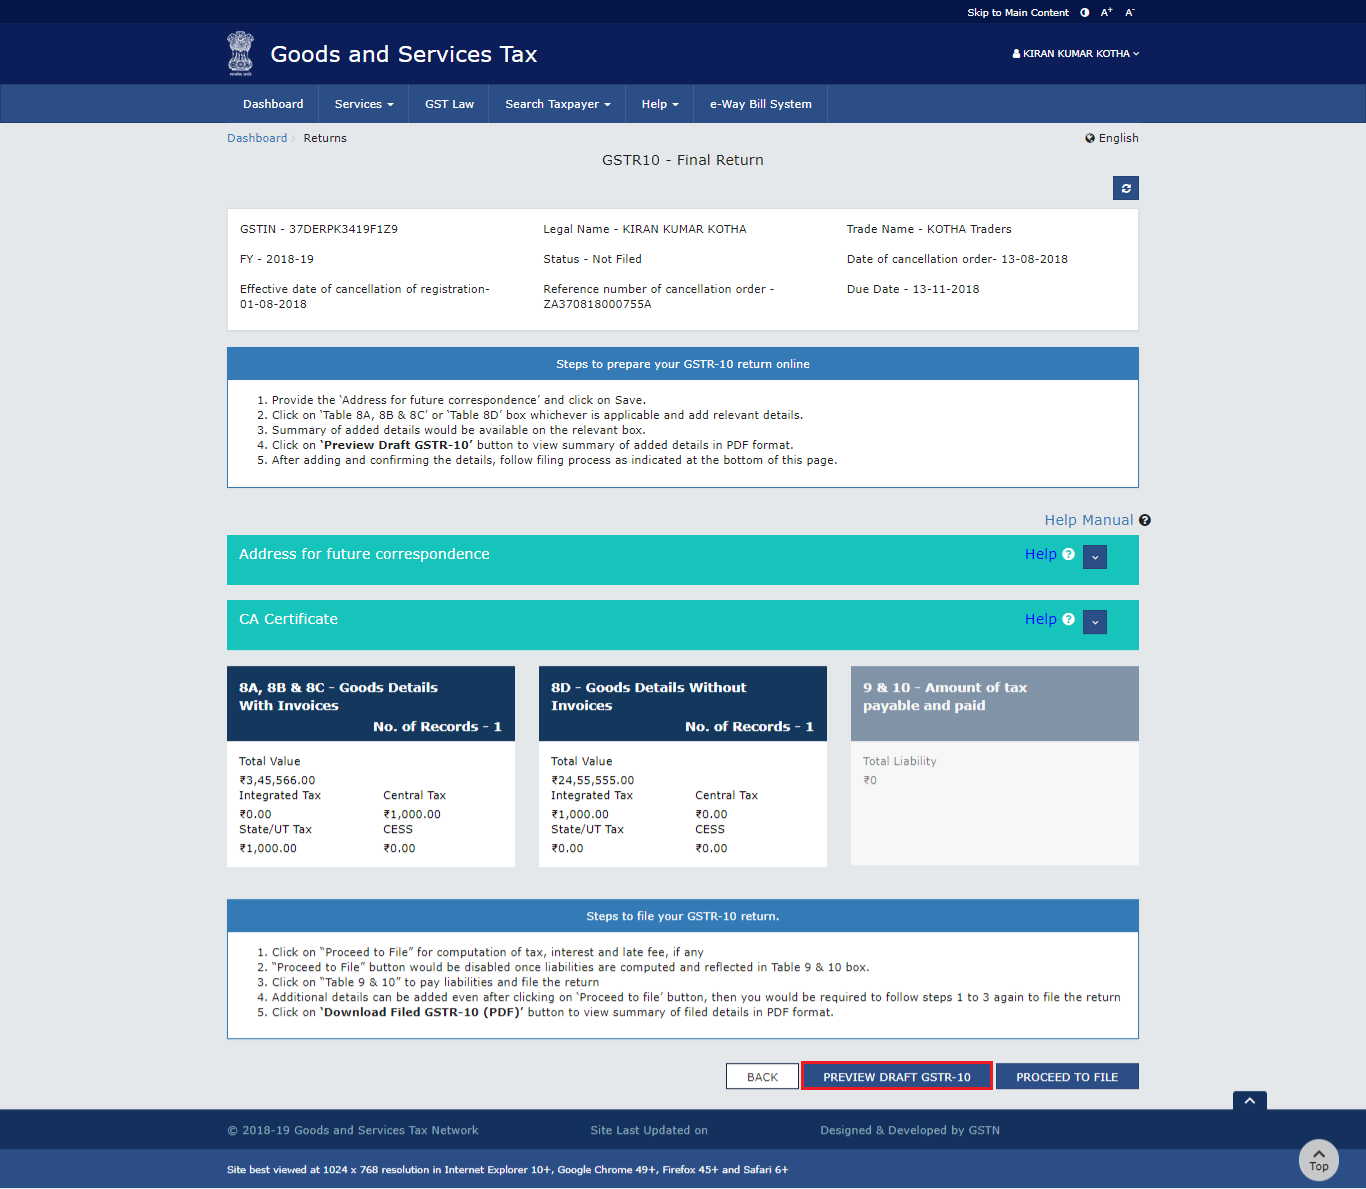
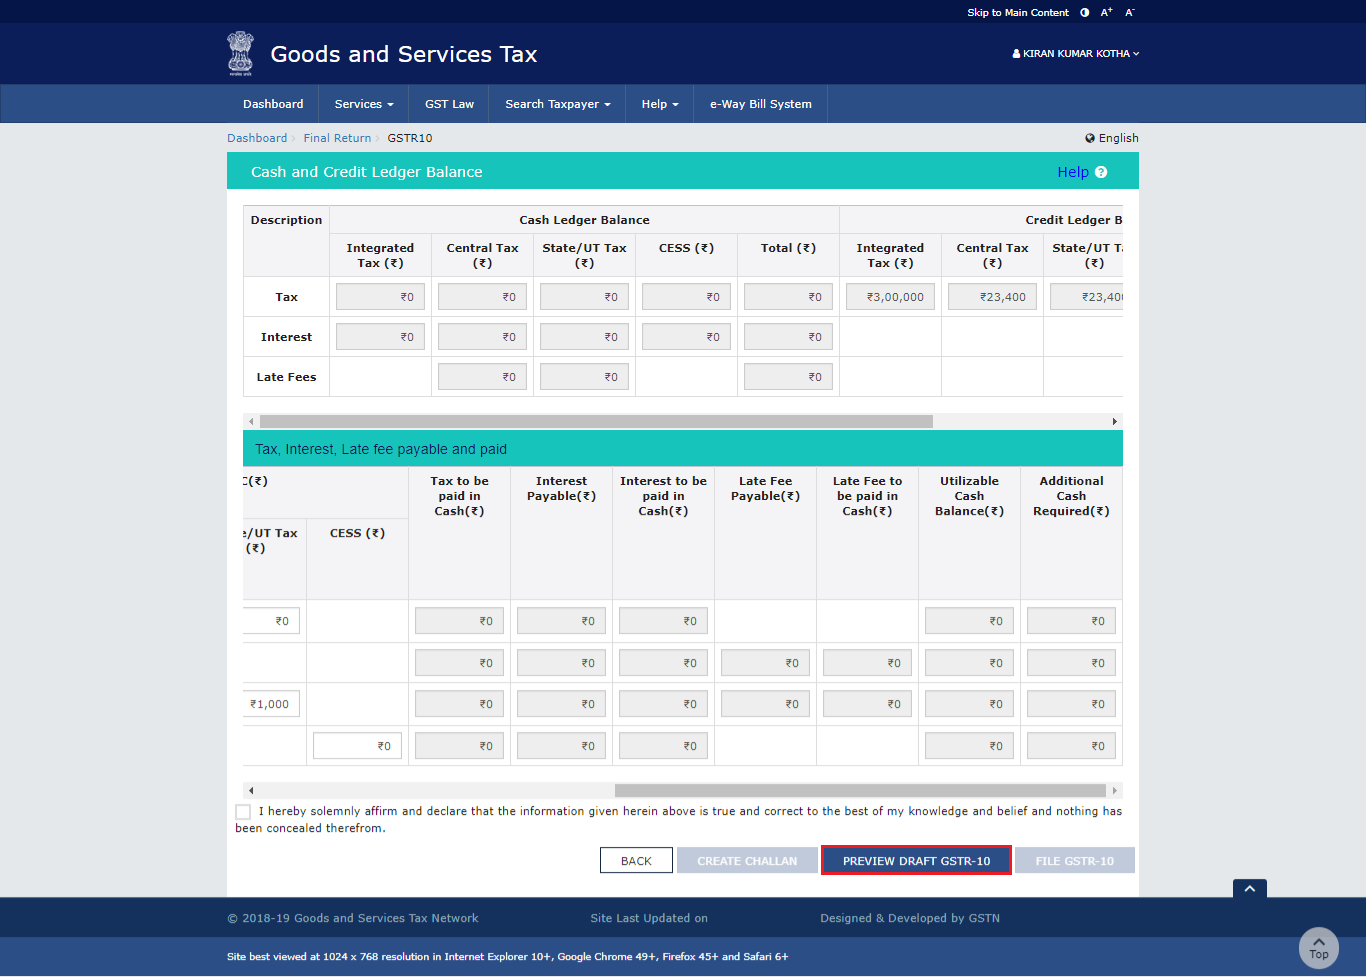
Step 11: Preview the form
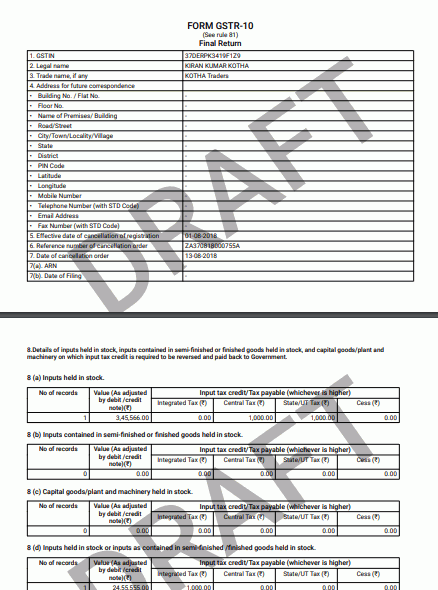
Click Preview Draft GSTR-10 to download the draft summary PDF for review.
The draft PDF appears on the screen with a draft watermark.
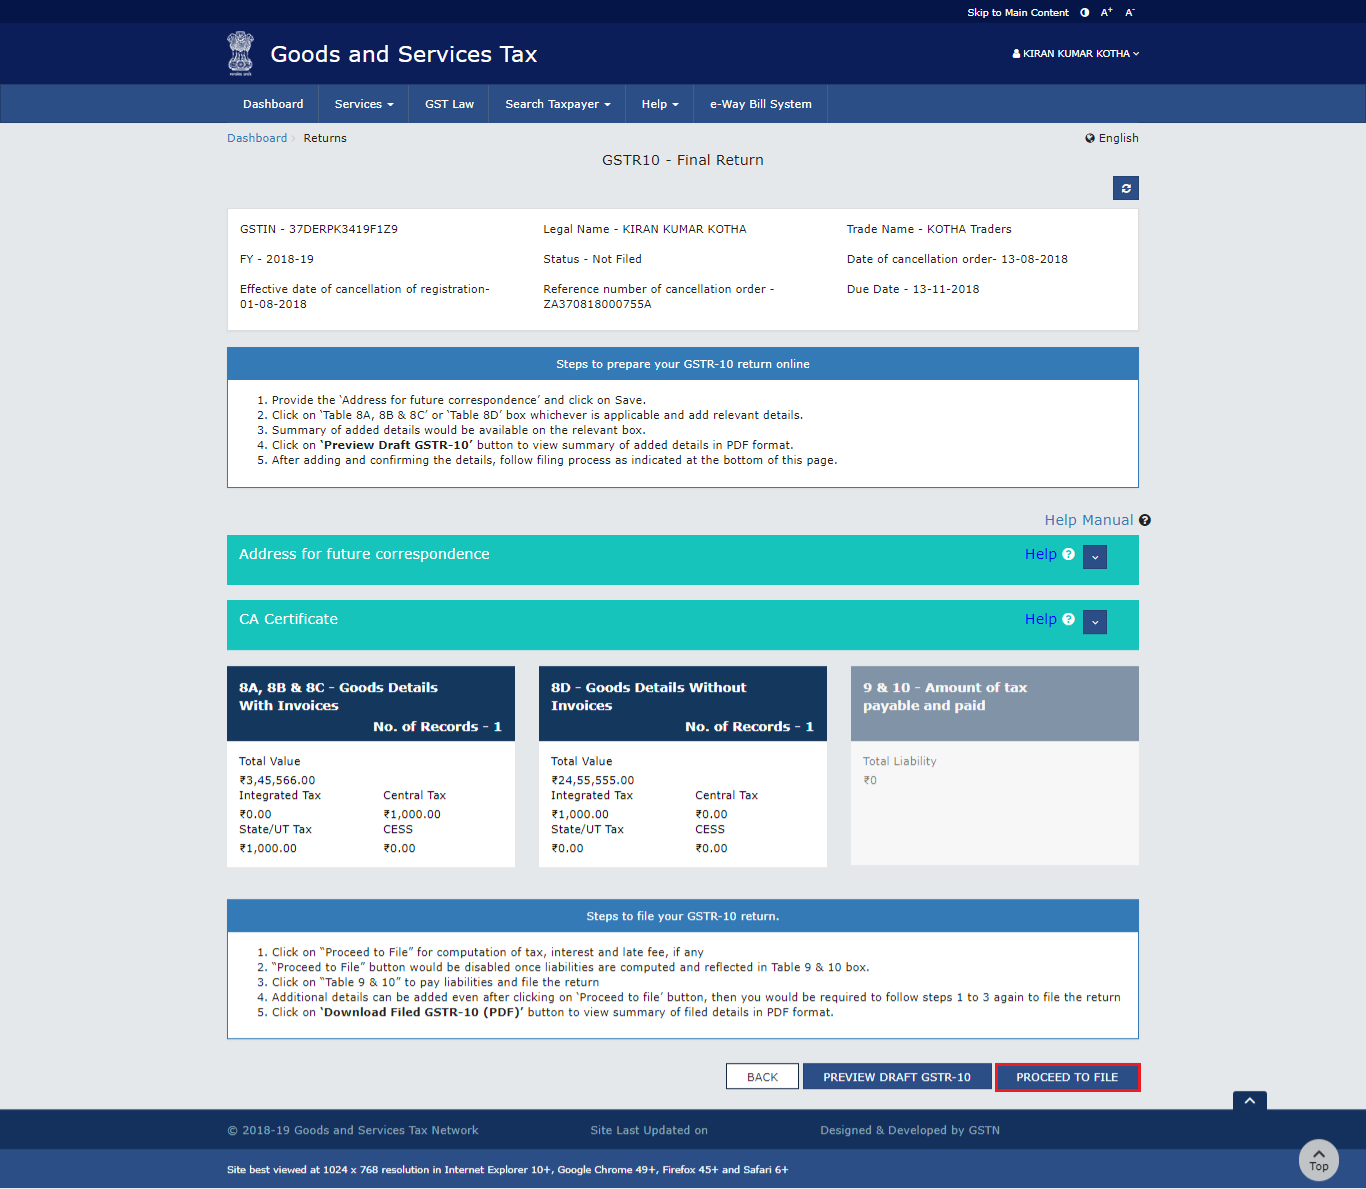
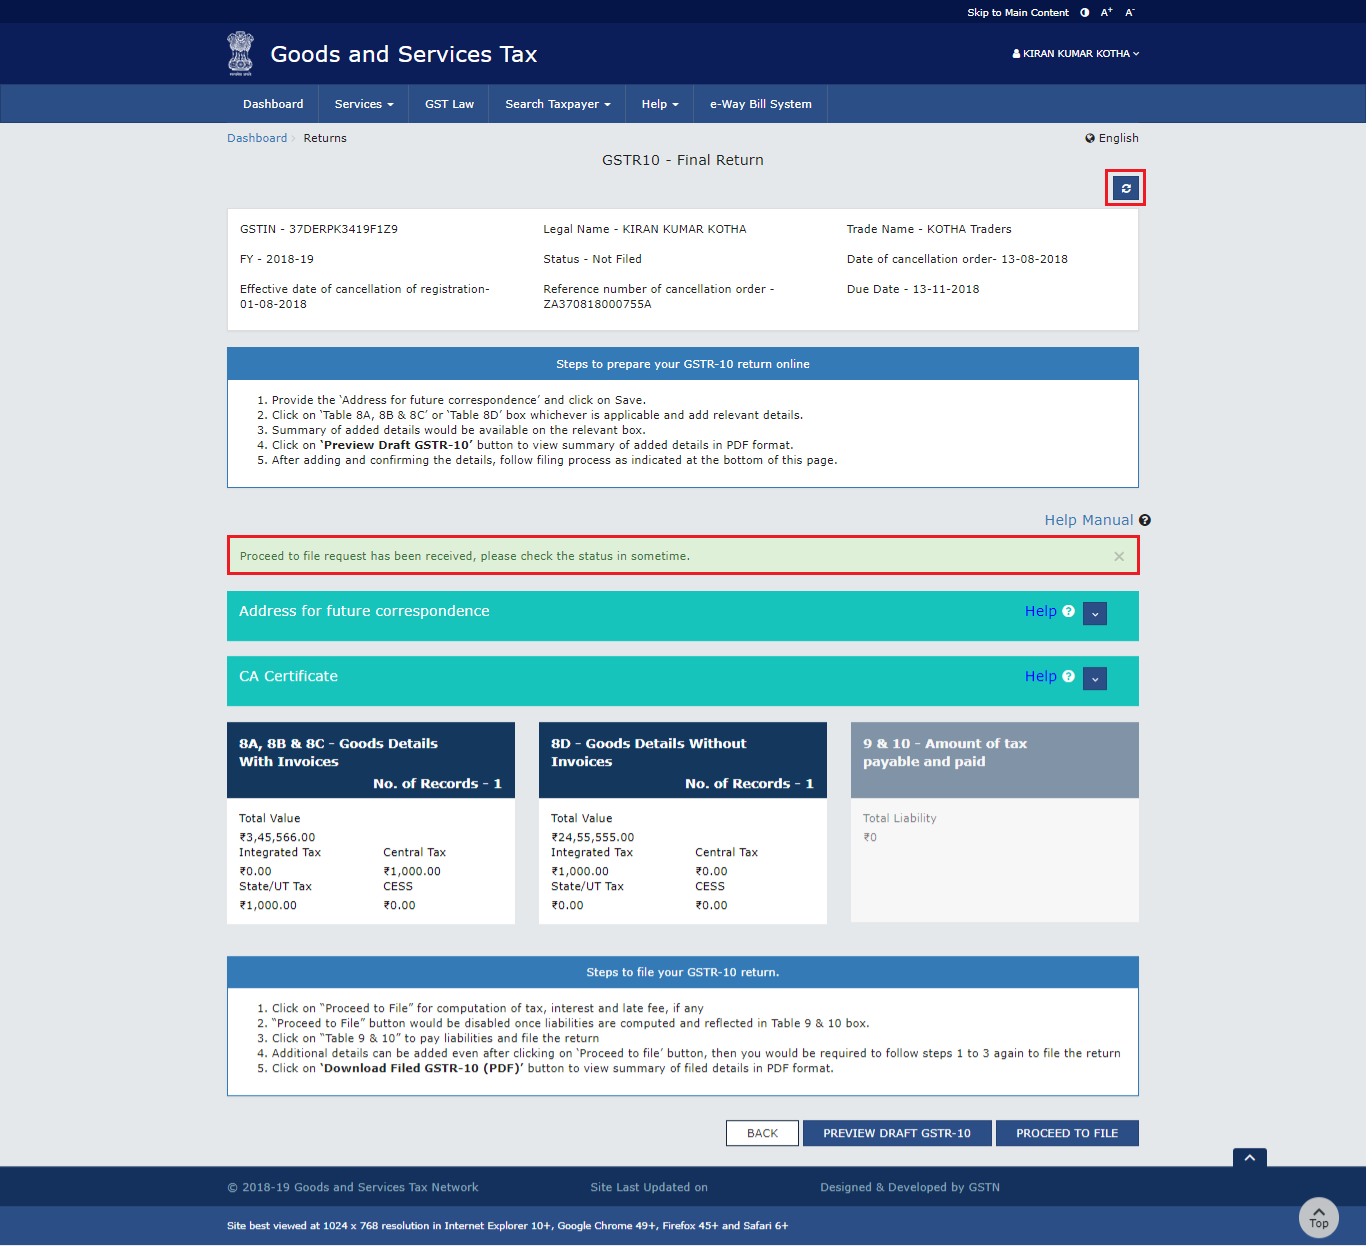
Step 12: Click Proceed to File
Click Proceed to File. The portal processes the request and updates the status after refresh.
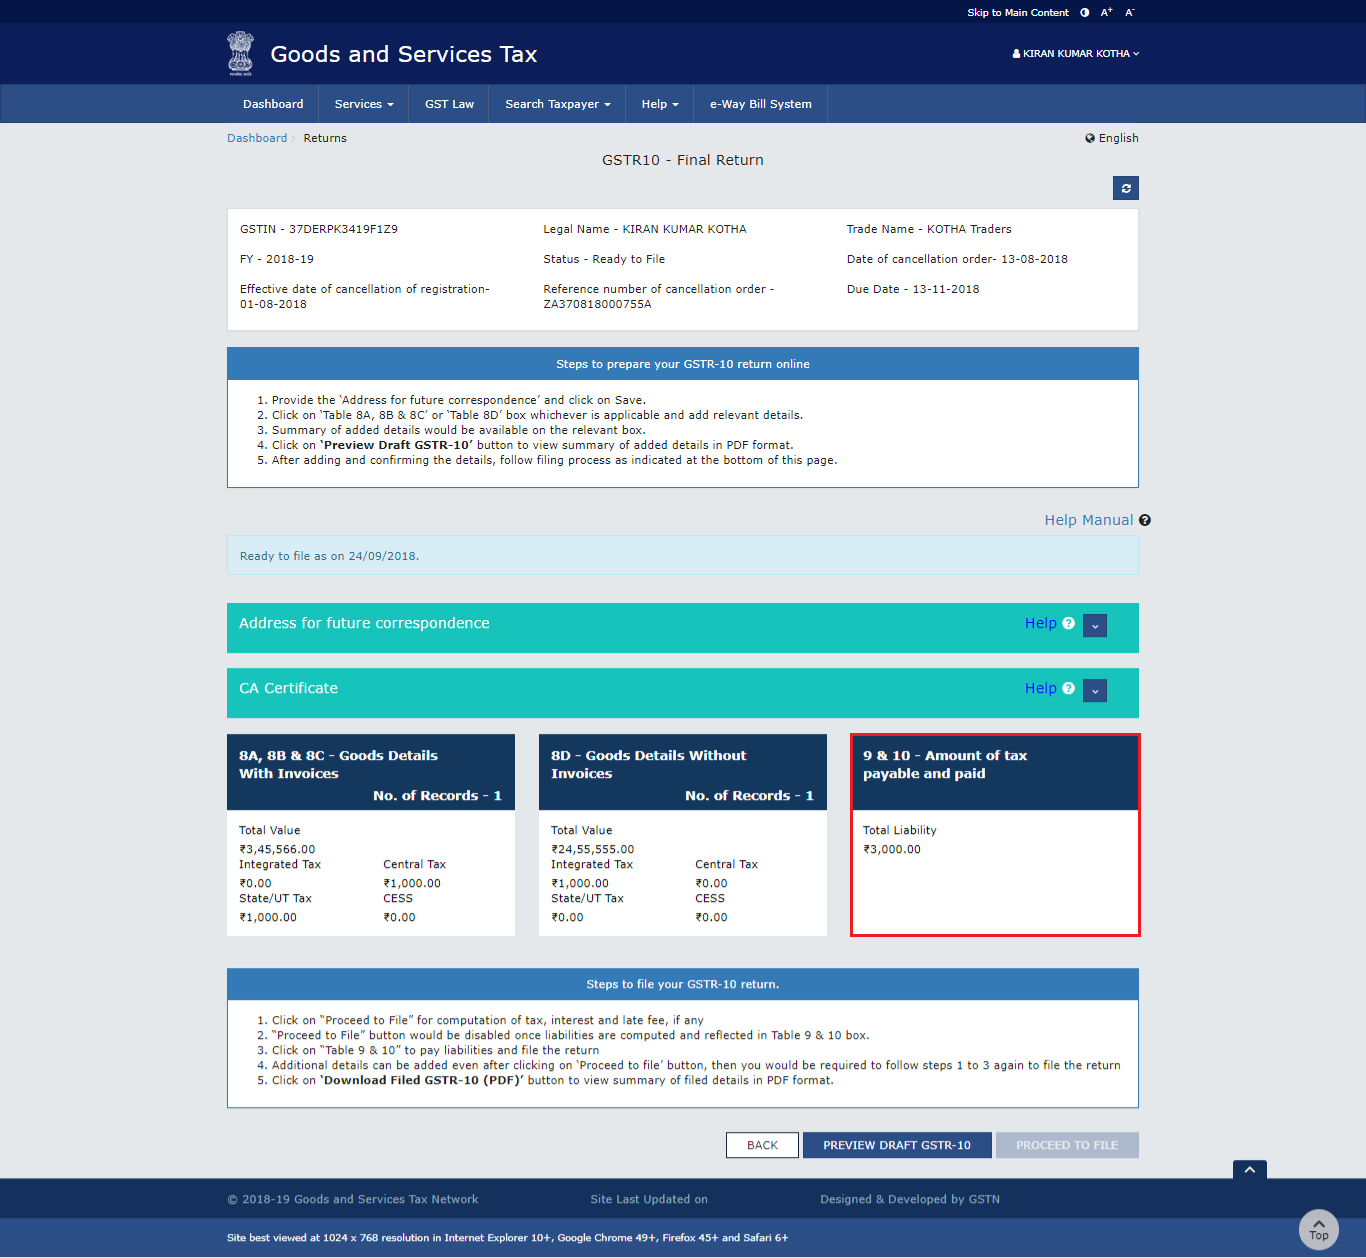
Step 13: Click Amount of Tax Payable and Paid
When the form is ready to file, open the Amount of Tax Payable and Paid tile.
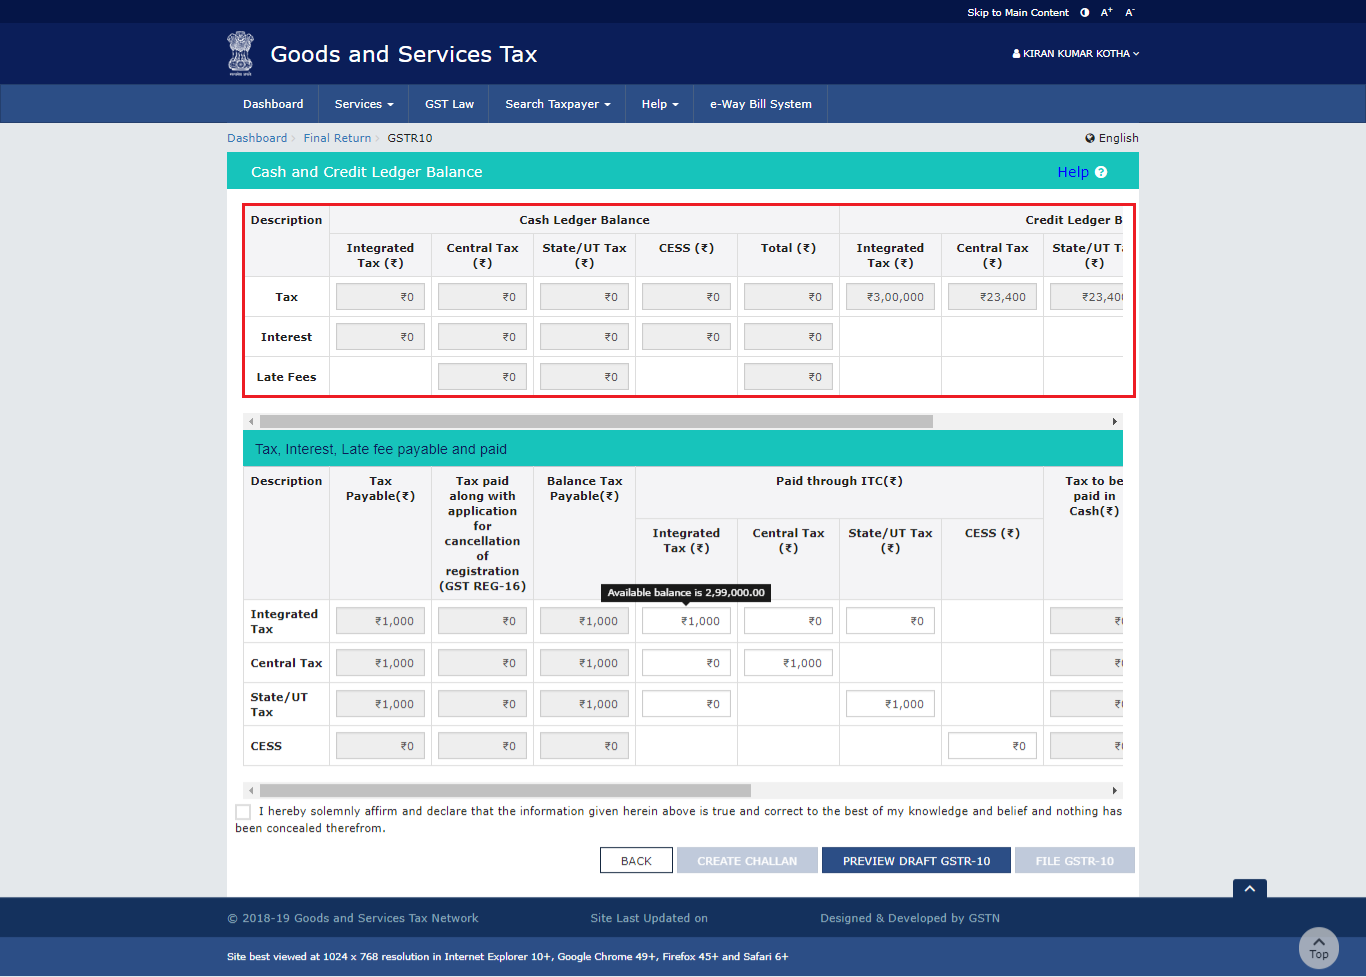
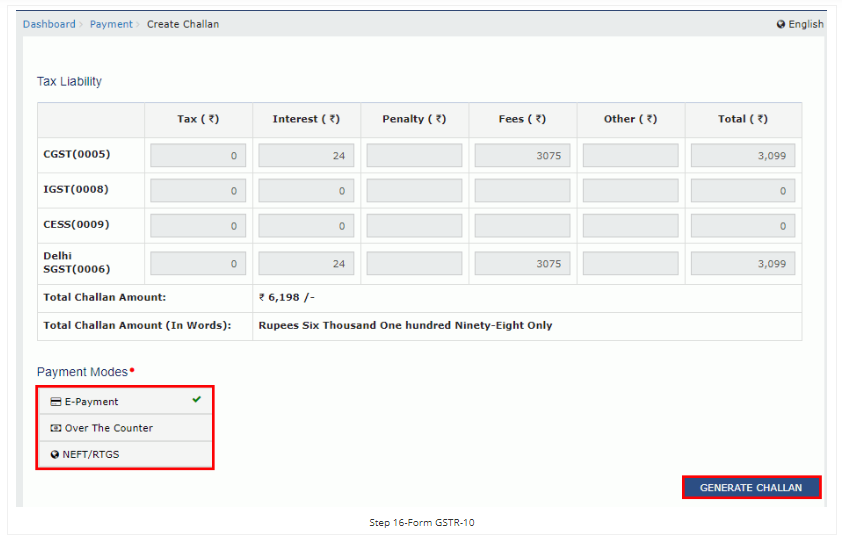
Step 14: Click Create Challan
If the ledger balance is insufficient to offset liabilities, click Create Challan for the remaining amount.
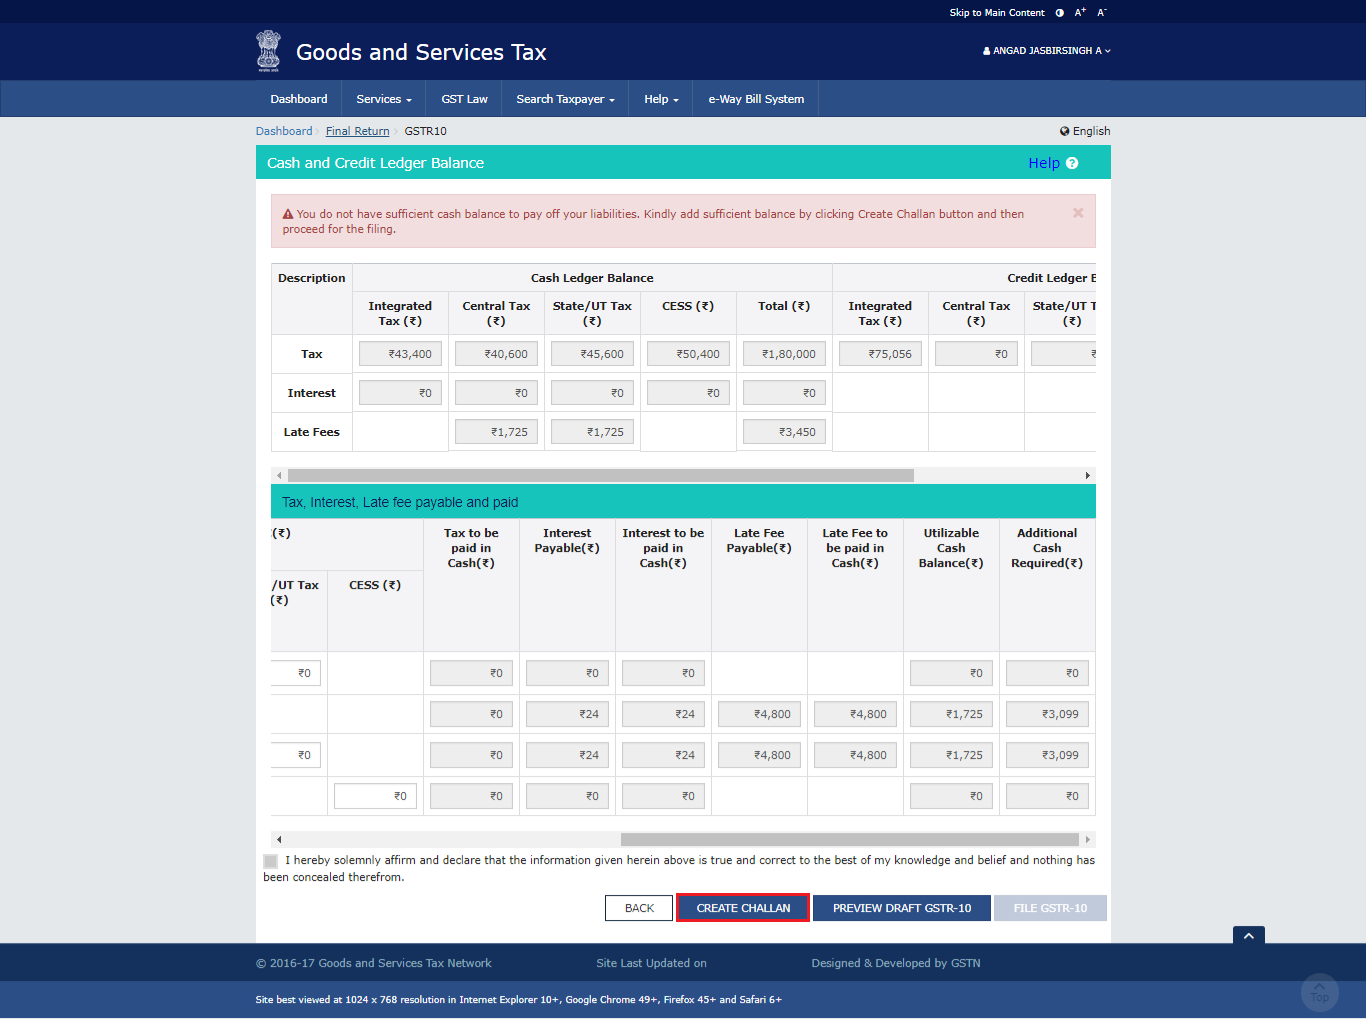
The portal auto-populates the total challan amount.
Step 15: Select payment mode
Choose one of the available payment modes: e-payment, over the counter, or NEFT/RTGS.
Step 16: Click Generate Challan
Generate the challan to complete payment for any outstanding liability.
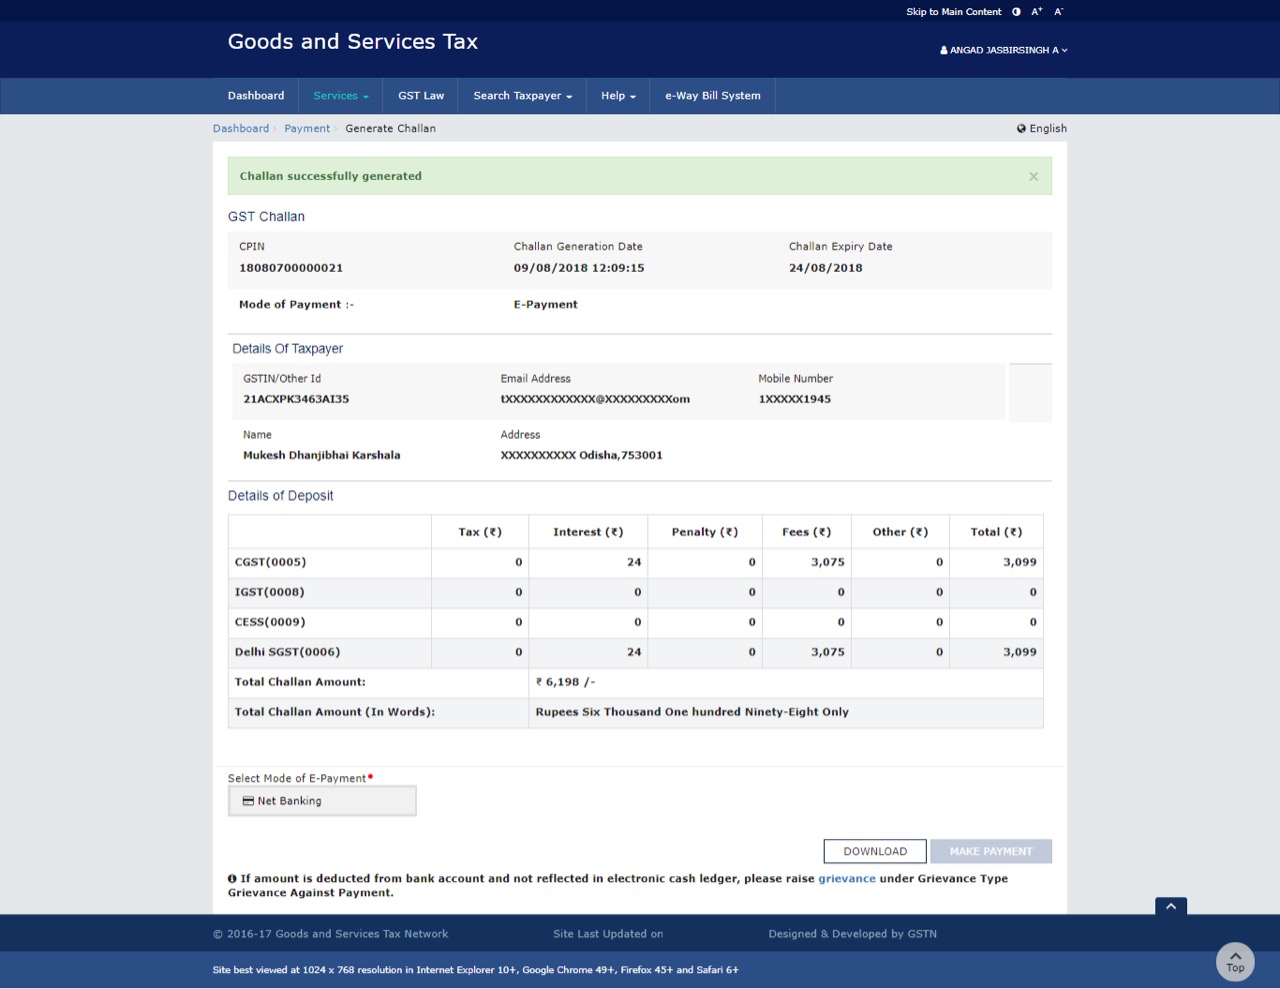
Payment modes include:
- Net Banking: Redirects to bank portal for payment and returns to GST portal after completion.
- Over the Counter: Print challan and pay via cash, cheque, or demand draft at the selected bank.
- NEFT / RTGS: Print challan and mandate form, then complete payment through the bank.
If the available balance in Electronic Cash Ledger / Credit Ledger is equal to or greater than the required liability, the taxpayer can offset the liability directly. The portal may auto-populate credit utilization and references to previous amounts paid.
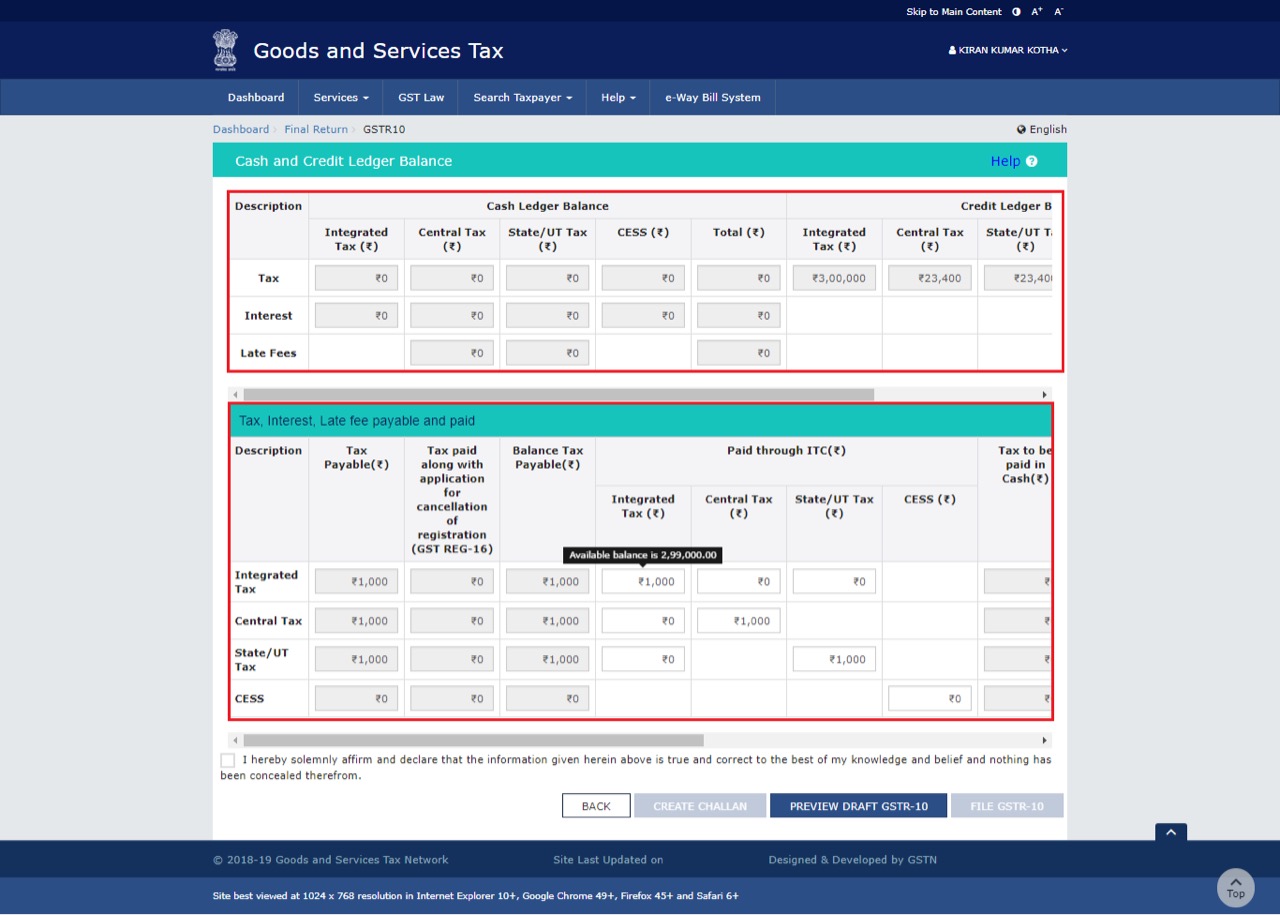
Step 17: Click Preview Draft GSTR-10 again
Review the summary page again before final filing.
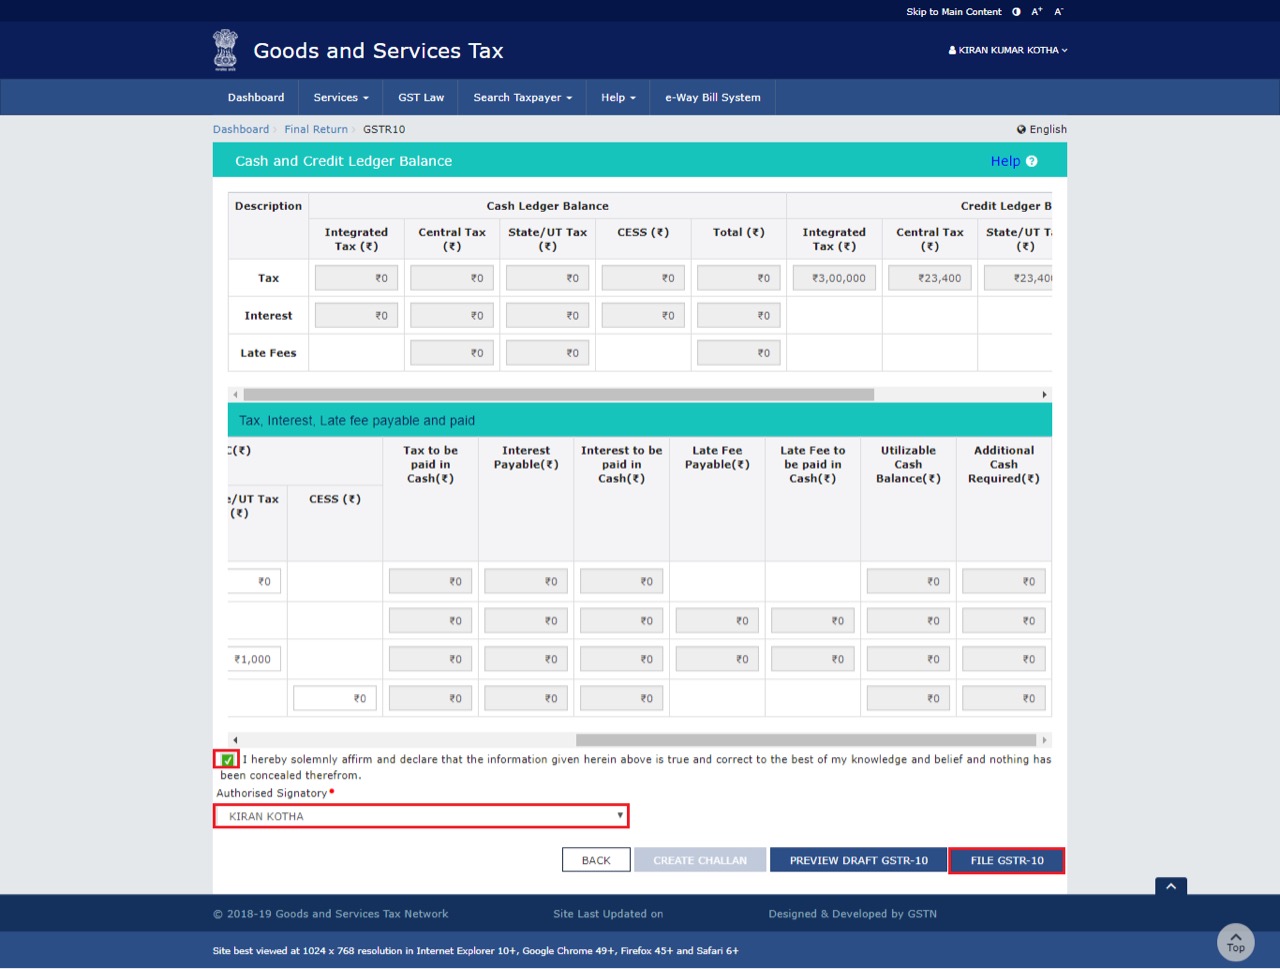
Filing Form GSTR-10
Follow these steps to file Form GSTR-10:
- Select the Declaration checkbox.
- Select the Authorized Signatory from the dropdown list.
- Click File GSTR-10.
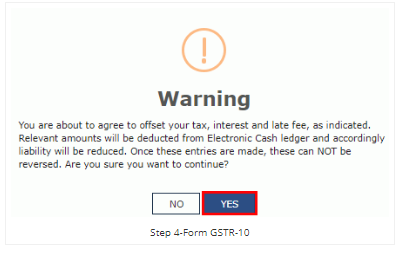
Step 4: Click Yes on the confirmation screen.
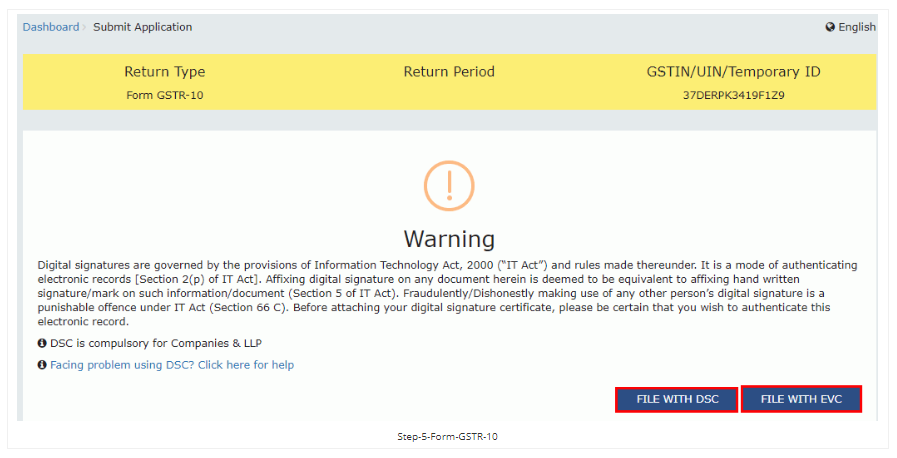
Step 5: File with DSC or EVC.
- File with DSC: Select the certificate and click Sign.
- File with EVC: Enter the OTP sent to the registered mobile number and email ID, then validate it.
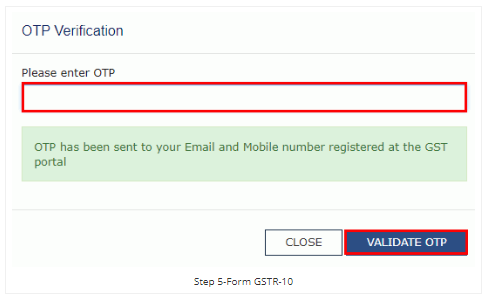
Once successfully filed, the portal displays a success message along with the ARN and changes the status of the form to Filed.
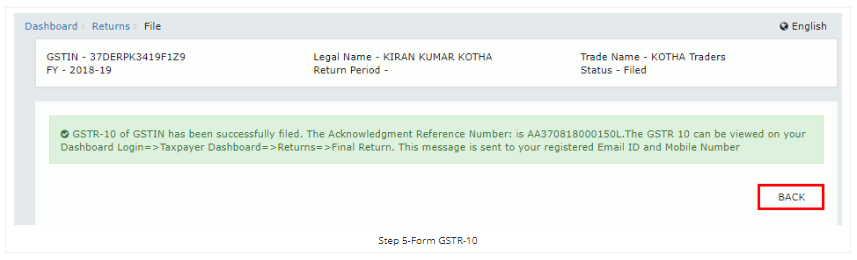
After successful filing:
- The portal generates an ARN for Form GSTR-10.
- The taxpayer receives SMS and email confirmation.
- Electronic Cash / Credit Ledger and Electronic Liability Register are updated after set-off.
- The filed return becomes available for record search and tax officials.
Download filed return
Step 6: Click Preview Final GSTR-10 to download the filed return.
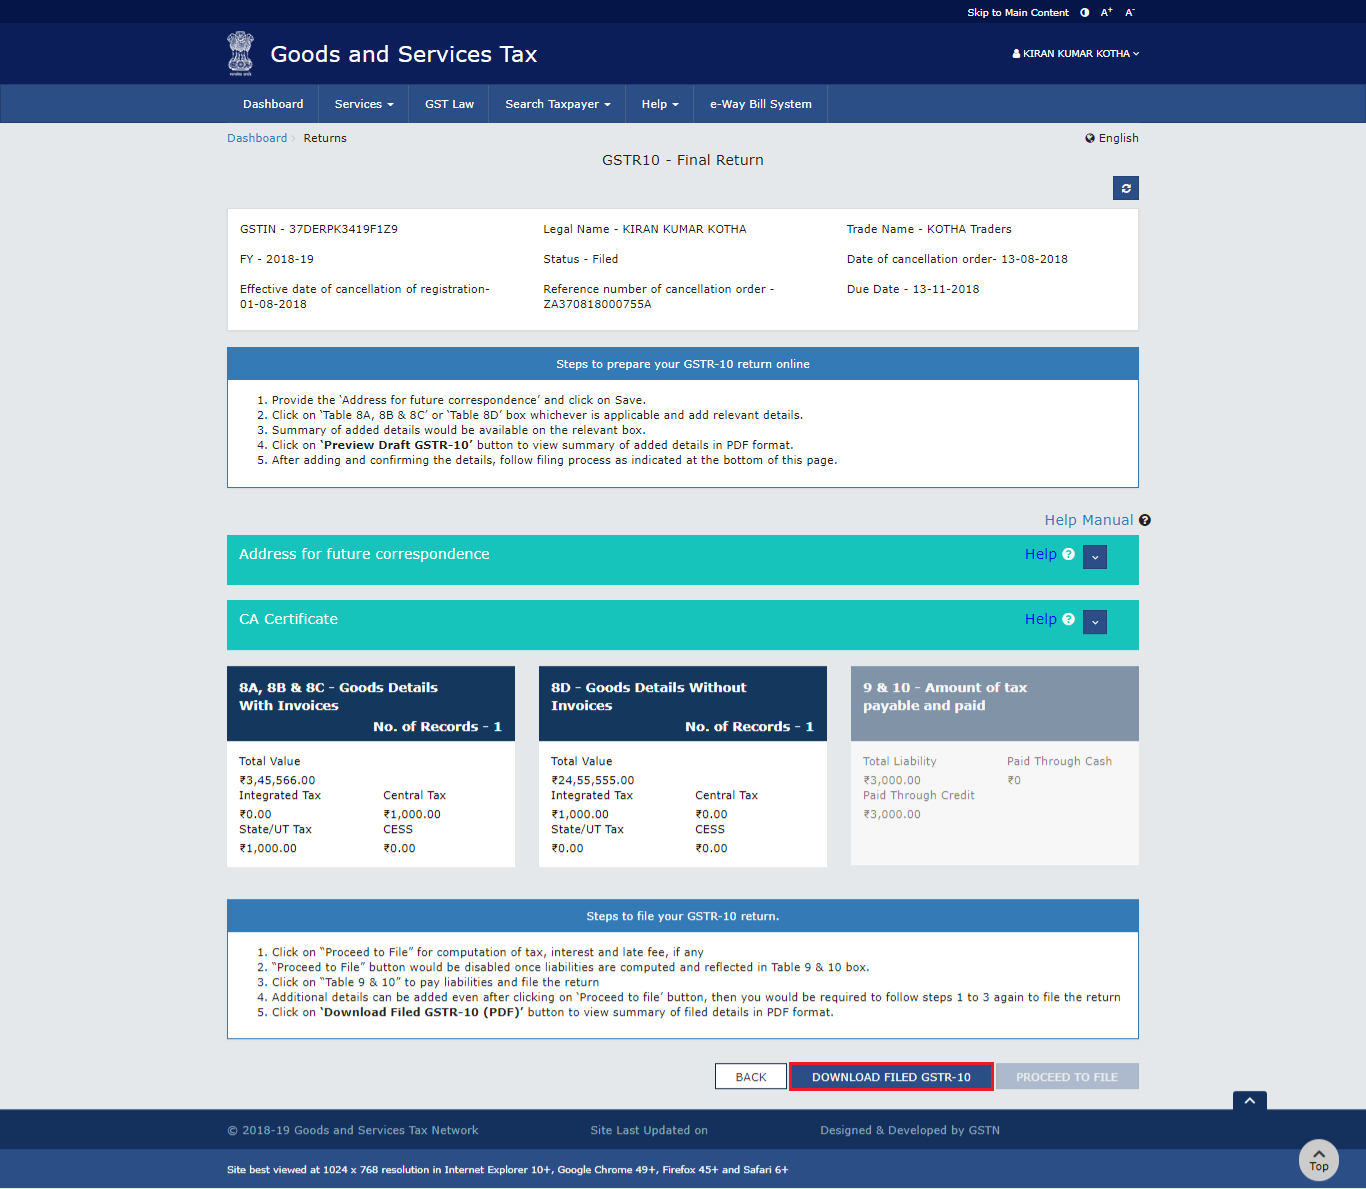
The downloaded PDF contains the final filed return watermark.